Adding a Picasa Album to your Blogger blog
- Edit your album properties in Picasa and make the album "Public"
- "Customize" your blog and edit the page layout by "Add a Page Element"
- Select the new Slideshow element
- Add a title, make sure it is pointing to Picasa Album, change radio to "Album"
- Enter your gmail account name without the "@gmail.com" part
- Select your public album and save
- Add one Slideshow element to your footer area
- Click the Edit HTML tab
- Find the "div" tags for the footer element
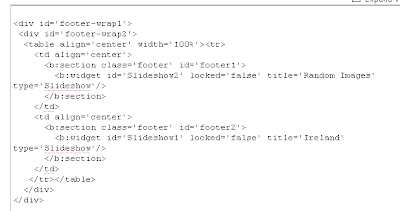
- After the "div id="footer-wrap2" tag create an HTML table with as many columns as you want to display
- Copy "b: section=" tag and data. This is the actual Slideshow element
- Paste each new "b:section" into it's own column
- Change the id for each "b: section" (ie. id='footer2')
- Change the id for each additional "b: section" widget (ie. id='Slideshow2')
- Change the title for the new "b: section" widget element to name= of the Picasa album (i.e. title='Ireland')
It should look something like this.

